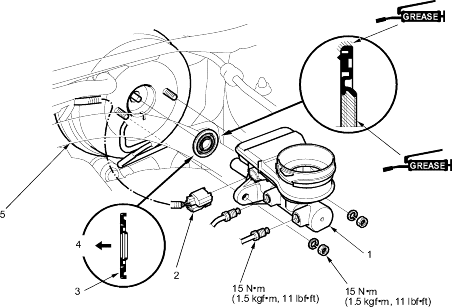
NOTE: Do not spill brake fluid on the vehicle; it may damage the paint; if brake fluid does contact the paint, wash it off immediately with water.
- Remove the reservoir cap and brake fluid from the reservoir tank.
- Remove the brake fluid level sensor connector.
- Disconnect the brake lines from the master cylinder. To prevent spills, cover the hose joints with rags or shop towels.
- Remove the master cylinder mounting nuts and washers.
- Remove the master cylinder from the brake booster. Be careful not to bend or damage the brake pipes when removing the master cylinder.
- Remove the rod seal from the brake booster (single brake booster type) or master cylinder (dual brake booster type).
|  |
- Install the master cylinder in the reverse order of removal and note these items:
- Replace all the rubber parts with new ones whenever the master cylinder is removed.
- Check the pushrod clearance before installing the master cylinder and adjust it if necessary (see page 19-29).
- Use a new rod seal on reassembly.
- Coat the inner bore lip and outer circumference of the new rod seal with the recommended seal grease in the master cylinder set.
- Install the rod seal onto the brake booster with its grooved side toward the master cylinder.
- Check the brake pedal height and free play after installing the master cylinder and adjust it if necessary (see page 19-5).
|
