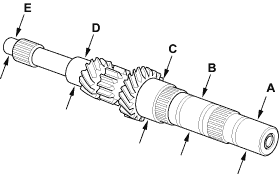
- Inspect the gear surface and bearing surface for wear and damage, then measure the mainshaft at points A, B, and C. If any part of the mainshaft is less than the service limit, replace it with a new one.
Standard:
A Ball bearing surface (transmission housing side):
27.987 - 28.000 mm (1.1019 - 1.1024 in.)
B Distance collar surface:
31.984 - 32.000 mm (1.2594 - 1.2598 in.)
C Needle bearing surface:
38.984 - 39.000 mm (1.5348 - 1.5354 in.)
D Ball bearing surface (clutch housing side):
27.977 - 27.990 mm (1.1015 - 1.1020 in.)
E Bushing surface:
20.80 - 20.85 mm (0.819 - 0.821 in.)
Service Limit:
A: 27.93 mm (1.100 in.)
B: 31.93 mm (1.257 in.)
C: 38.93 mm (1.533 in.)
D: 27.92 mm (1.099 in.)
E: 20.75 mm (0.817 in.)

![]()
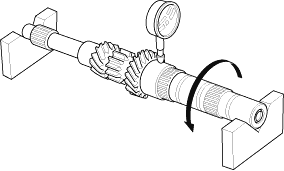
- Inspect the runout by supporting both ends of the mainshaft. Rotate the mainshaft two complete revolutions when measuring the runout. If the runout is more than the service limit, replace the mainshaft with a new one.
Standard:
0.02 mm (0.001 in.) max.
Service Limit:
0.05 mm (0.002 in.)
